Crawling a database
This quick OpenSearchServer tutorial will teach you:
- how to crawl a MySQL database
- how to set up an attractive search page (with facets, auto-completion, snippets, etc.).
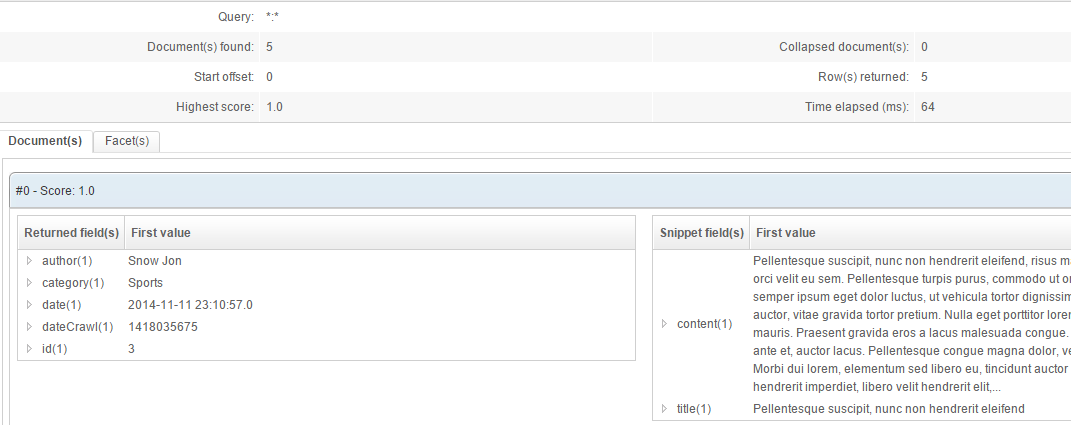
Here is an example of the end result:

Creating the database
This example will use a small database with 3 tables. This database is used to store articles, authors and categories.
Here are screenshot of these tables:
Table articles:

Table authors:
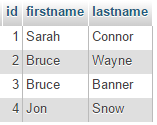
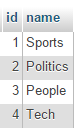
Table categories:
A query to retrieve all useful information might be:
SELECT a.id, a.title, a.content, a.date_created, c.name as category, CONCAT(au.lastname, ' ', au.firstname) as author, UNIX_TIMESTAMP() as time
FROM articles a
LEFT JOIN categories c ON c.id = a.id_category
LEFT JOIN authors au ON au.id = a.id_author
Here are the results for this query:

As you can see, this query returns all useful data on one line, for each article. The OpenSearchServer database crawler can read these results and write one document in the index for each line, identified by the column id.
Another useful feature of the crawler is to merge several lines sharing the same unique ID. For instance, the database might use join tables and the final query would return several lines for one article, but with one different category by line. In this case the crawler can create but one document in the index by assigning multiple values to its
categoryfield.We will not cover this case in this tutorial though, but it's nice to know that it's possible!
To use this example as an exercise, you can download the MySQL scripts at https://gist.github.com/AlexandreToyer/f00c3eec976e654e211b and create a local database on your computer. It could also be a PostgreSQL database, or some other kind of database.
When your database is ready go to OpenSearchServer's interface.
Creating and configuring the index's schema and analyzers
Creating the index
Create an empty index, named articles.
Creating the analyzers
Two analyzers are needed in order to transform the data.
Analyzer _KeepFirstLetterOnly
This analyzer will be used to index the first letter of the author's name in a particular field. We will then use this field as a facet.
Go to tab Schema / Analyzer and create this analyzer:
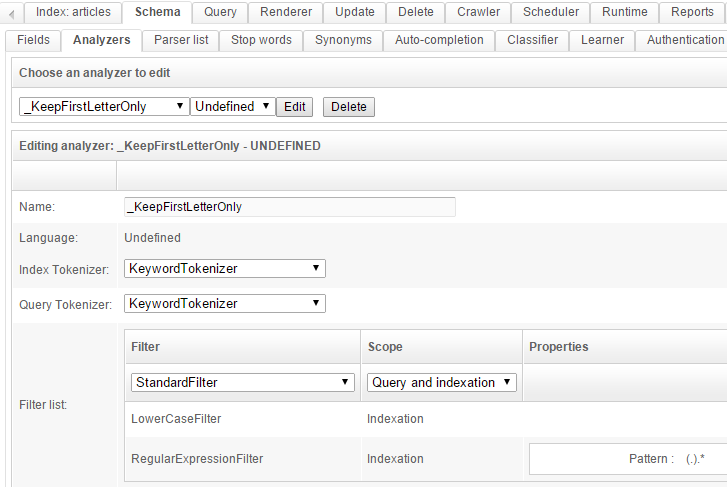
You can test it in the test area in the bottom. It will only keep the first letter of the given text.
Analyzer _KeepYearMonth
This analyzer will be used to extract the year and the month from a full date, such as 2014-10-14 10:25:34. This data will then be used as a facet to filter on month.
Go to tab Schema / Analyzer and create this analyzer:
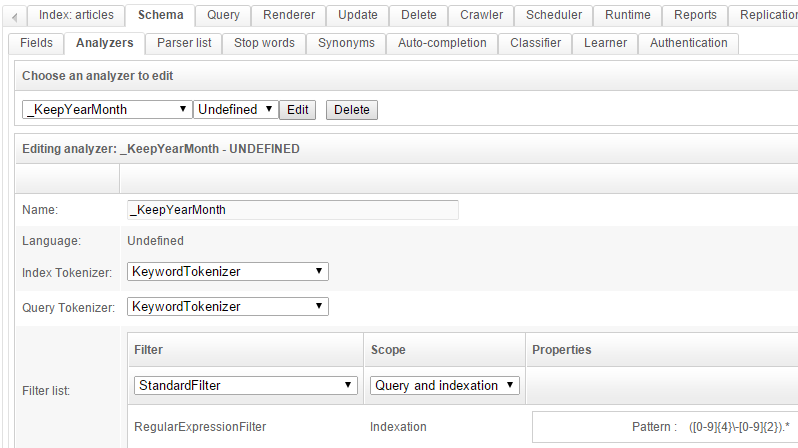
The regular expression to use here is ([0-9]{4}\-[0-9]{2}).*.
You can also test it in the test area in the bottom.
Creating the schema
Go to the Schema tab and create the following fields:
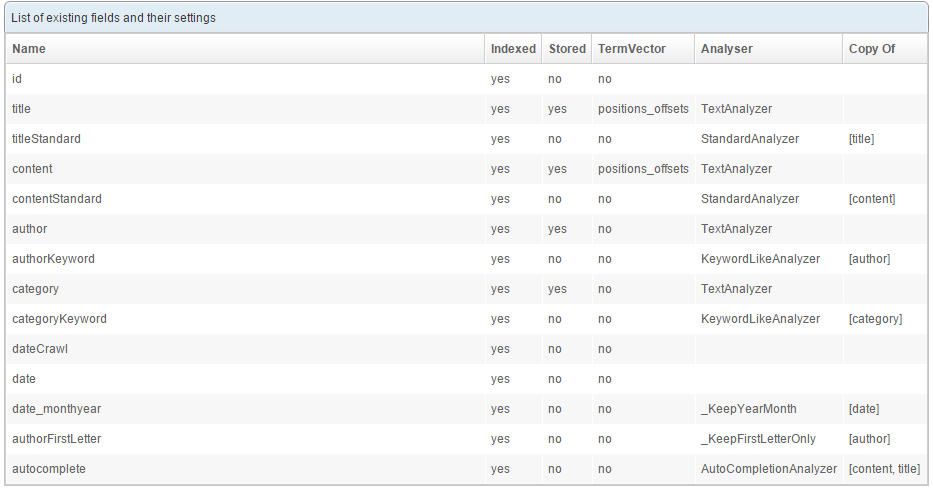
Some fields get created in several versions, each one using a particular analyzer. For instance the title and titleStandard fields both store the same value (the title of the article) but index it in a different way: the field title uses a TextAnalyzer and the field titleStandard uses a StandardAnalyzer. These fields will be assigned different weights when creating the query.
Have a look at the How to use analyzers page to understand it all.
Default and unique fields
Using the lists located at the top of the page (still in the Schematab) configure the index with:
- Default field:
content - Unique field:
id
The unique field will be used to uniquely identify the documents. When crawling the database, those articles that already exist in the index will thus be updated rather than created.
Configuring the crawler
Here comes the part where we actually work with the database.
Go to the Crawler / Database tab and click the New crawl... button.
Configure the first tab as follows:
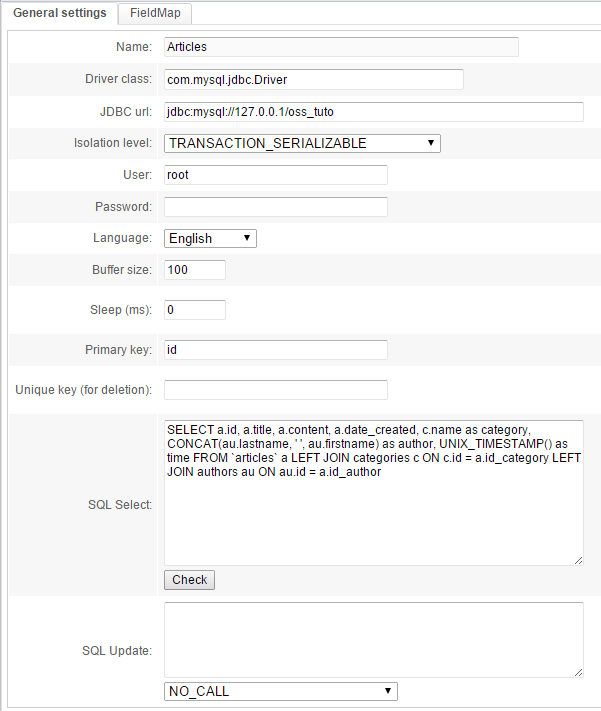
The following information is specific to your project:
- Driver class: choose the one matching your type of database
- JDBC URL: this connection string can vary depending on your type of database. For MySQL for example it will be:
jdbc:mysql://<host>:<port_if_any>/<database_name> - Of course the database host must be accessible from the servers used by OpenSearchServer.
- User: a user with read rights to your database
- Password: the password for this user
The SQL Select query was the one discussed near the beginning of this tutorial.
The UNIX_TIMESTAMP() function will be used to save the time of indexing. An SQL CONCAT is used to concatenate lastname and firstname for the authors.
Click the Check button. A popup displaying the name of columns pops up:

Go to the FieldMap tab and add these mappings:
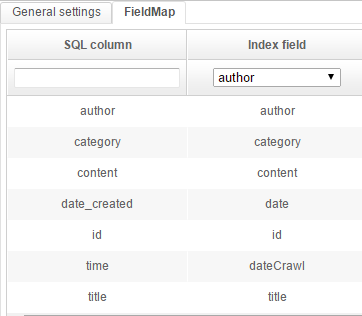
What this means is:
- the value of each column found by the SQL query will be indexed in a particular field of the schema
- the
Copy offeature used earlier when creating fields will be used to copy a single value value to several fields, sparing the need to add multiple mappings to those fields
Create (or Save) the Crawl and then click on the button with the green icon to start it. It should quickly say "Complete".
If message "Error" is shown, hover over it with your mouse to get a tooltip. It may be an SQL error, or you may have forgotten some mappings in the
FieldMaptab. The "Unique field" of the schema in particular must have a mapped values.

Configuring the autocompletion
Go to the Schema / Auto-completion tab to create an autocompletion item, using the field "autocomplete":
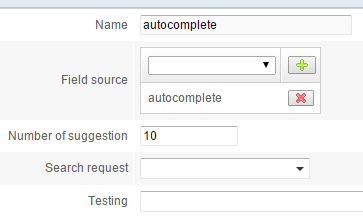
Click the Create button. In the list below click on the Build button to populate the auto-completion sub-index.
Creating a query
The documents are now indexed, and that's half the battle. But we still need a query to search them.
Go to the Query tab and create a new query (type Search (field)), named "search".
Configure it as shown below:
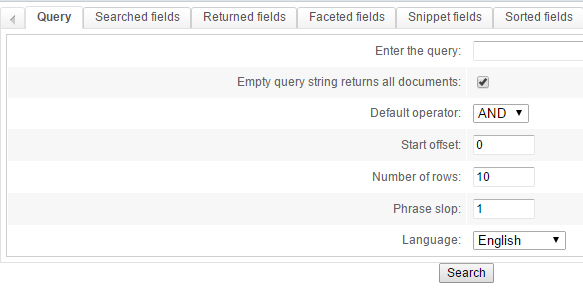
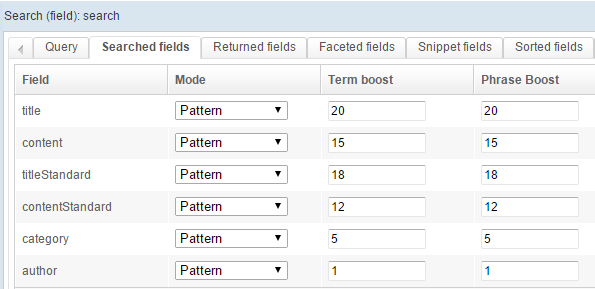

This is a fairly standard setup:
- we use a AND with a phrase slop of 1
- we search different fields, and give a different weight to those
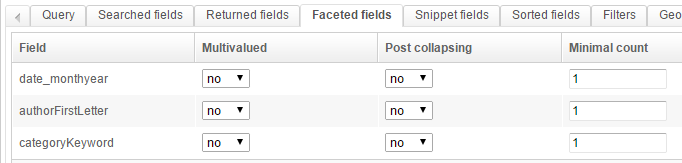
- we want to return some fields, and create some facets
- we configure the snippets so they highlight the searched-for keywords in the results
Click the Search button to test it:
Creating a renderer
The final step is to create a renderer that will use our query template.
Go to the Renderer tab and configure it as follows:
Global configuration:
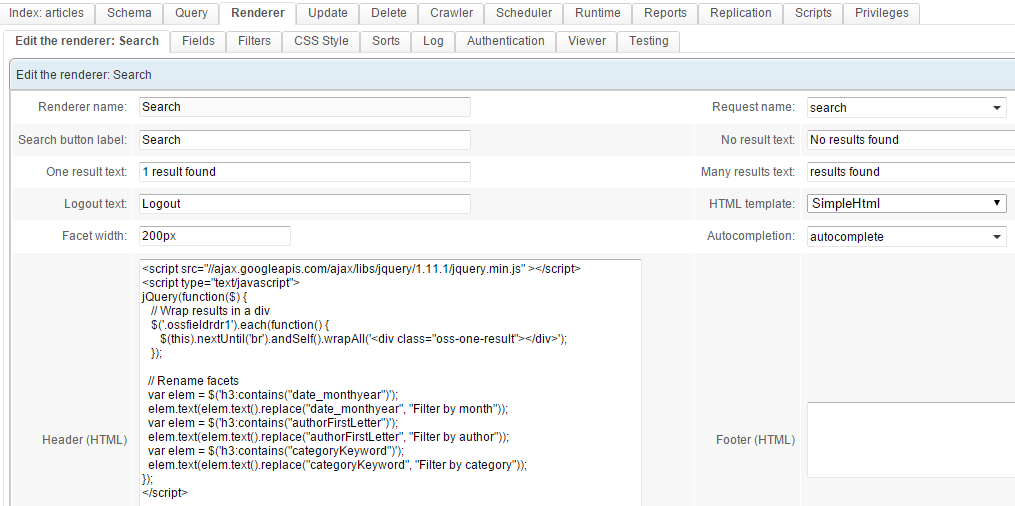
Use the query template (request) (which we named search in this example), and the autocompletion we created earlier.
To enhance the display and rename facets, we'll be using some JavaScript. Specifically we'll use jQuery as dynamically loaded from the Google CDN. The full code is:
<script src="//ajax.googleapis.com/ajax/libs/jquery/1.12.4/jquery.min.js" ></script>
<script type="text/javascript">
jQuery(function($) {
// Wrap results in a div
$('.ossfieldrdr1').each(function() {
$(this).nextUntil('br').andSelf().wrapAll('<div class="oss-one-result"></div>');
});
// Rename facets
var elem = $('h3:contains("date_monthyear")');
elem.text(elem.text().replace("date_monthyear", "Filter by month"));
var elem = $('h3:contains("authorFirstLetter")');
elem.text(elem.text().replace("authorFirstLetter", "Filter by author"));
var elem = $('h3:contains("categoryKeyword")');
elem.text(elem.text().replace("categoryKeyword", "Filter by category"));
});
</script>
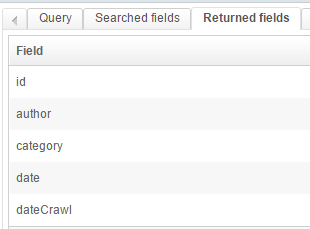
Fields
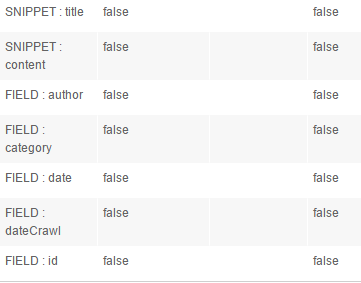
The first two lines are SNIPPET, the other ones are FIELD. We'll run a test where we display the dateCrawl and id fields.
In order to choose fields from the list Field / Snippet, first create the renderer (click Create) with a query template chosen from the Request name list (in the first sub-tab). Then edit it again (click Edit in the list of renderers and come back to the Fields tabs).
CSS Style
Now for some CSS code to beautify the results:
body { font-family: Arial, sans-serif; background:#efedea; color:rgb(124, 112, 94); }
#oss-wrap { width:1000px; margin:20px auto 0 auto; font-size:14px; line-height: 24px;}
.oss-one-result { background:white; padding:20px; margin:0 0 10px 0; border:1px solid rgb(228, 225, 220);}
/* Search box */
.ossinputrdr { height:30px; padding:3px; font-size:1em;}
/* Search button */
.ossbuttonrdr { height:40px; }
/* Num found */
.ossnumfound { margin:10px 0 0 0; }
/* Title of article */
.ossfieldrdr1 { text-align:center; color:#bd5532; font-family: Tahoma; font-size:2.1em; margin:10px 0 20px 0;}
/* Content */
.ossfieldrdr2 {}
/* Author, category, date */
.ossfieldrdr3:before { content: 'Written by: ';}
.ossfieldrdr4:before { content: ', in: '}
.ossfieldrdr5:before {content: ', ';}
.ossfieldrdr3, .ossfieldrdr4, .ossfieldrdr5 { color:#ada393; font-style:italic; display:inline-block;}
/* For debugging purpose: Crawl date and ID article */
.ossfieldrdr6:before {content:'Last crawled time: ';}
.ossfieldrdr7:before {content:'ID: ';}
.ossfieldrdr6 { border-top:1px solid #CDCCC9; margin-top:20px;}
.ossfieldrdr6, .ossfieldrdr7 { font-size:0.9em; color:#CDCCC9;}
/* Facets */
.oss-facet h3 { color:#6f9d9f; font-family:Tahoma;}
.oss-facet a { color:#bd5532; }
.oss-facet ul { padding-left:10px;}
/* Autocomplete */
#ossautocompletelist{ background:white; padding:0px; border:1px solid rgb(228, 225, 220);}
.ossautocomplete_link , .ossautocomplete_link_over { cursor:pointer; display:block; padding:5px; }
.ossautocomplete_link_over { background:#efedea;}
That's it! Click Save & close and then click View in the list of renderers.
The autocompletion should be active.
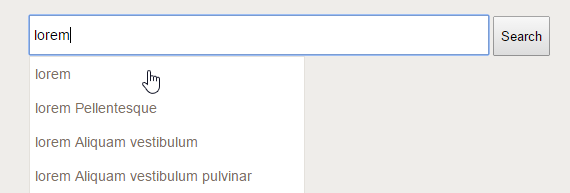
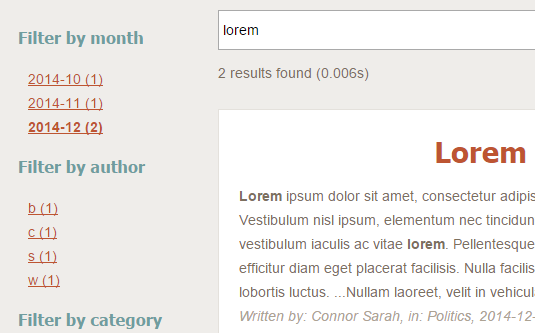
Try searching for "Lorem". Facets are dynamically loaded and can be used to easily filter content on a particular field:
Going further
Scheduling the crawl
The crawl process can be launched automatically on a regular basis. To do so create a job for the scheduler in the Scheduler tab and choose the Database crawler - run task.
Scheduling the autocompletion rebuilding
You could also want to automatically rebuild the autocompletion sub-index after each crawl. To do so simply add a Build autocompletion task to your previously created job of scheduler.
Using variables when crawling
Several variables can be used in the SQL query. Values for these variable can be given at crawl time. See How to use variables with the database crawler to discover this advanced feature.